I love a good apple pie recipe because it brings this cozy energy into my kitchen without any fuss. There’s something comforting about simple ingredients transforming into something warm and special. I never pretend to be fancy in the kitchen, but I like knowing I can pull together a reliable dessert that works every single time.
I’ve found that people often overcomplicate pies. They stack too many steps, or they stress over every tiny detail. I take a calmer route. I get the ingredients ready, keep things chilled, and let the apples do their thing. It all stays easy, steady, and predictable. That’s the kind of baking that keeps me sane in a busy season.
I also keep my climate in mind. I live in Florida, where cold weather rarely enters the chat. Baking a pie here sometimes feels like rebelling against the humidity. I still do it because a homemade dessert always cuts through the heat in a sweet way. I’ve learned to chill my dough longer and handle it quicker since the warm air moves fast. That small adaptation makes everything smoother.
This post walks you through how I keep the process simple without losing flavor. Then I get into dough, filling, baking time, and the small tips that keep the pie sturdy. Perfection isn’t my goal. Dependable and delicious always win because steady methods make better pies. You’ll see a step-by-step that actually helps and doesn’t overwhelm you.
I’ll also share my approach to apple slices, spices, and sugar. Each part matters, but none of it needs to stress you. You’ll get a clear, doable plan from start to finish. By the end, you’ll know exactly how to make a pie that tastes great and doesn’t collapse when sliced.
Some of the links on this page are affiliate links, which means that if you click on them and buy something, I might get a small commission. But don’t worry; it never costs you more. You can peek at my full disclosure if you’re curious about the fine print.
The Dough Strategy That Keeps Things Simple
I think pie dough scares people more than anything else in baking. It doesn’t need to. My approach removes the panic and keeps everything predictable. Although some bakers chase flawless layers, I chase steady results. This dough method works because it relies on simple steps and cold ingredients. Even beginners find it manageable.
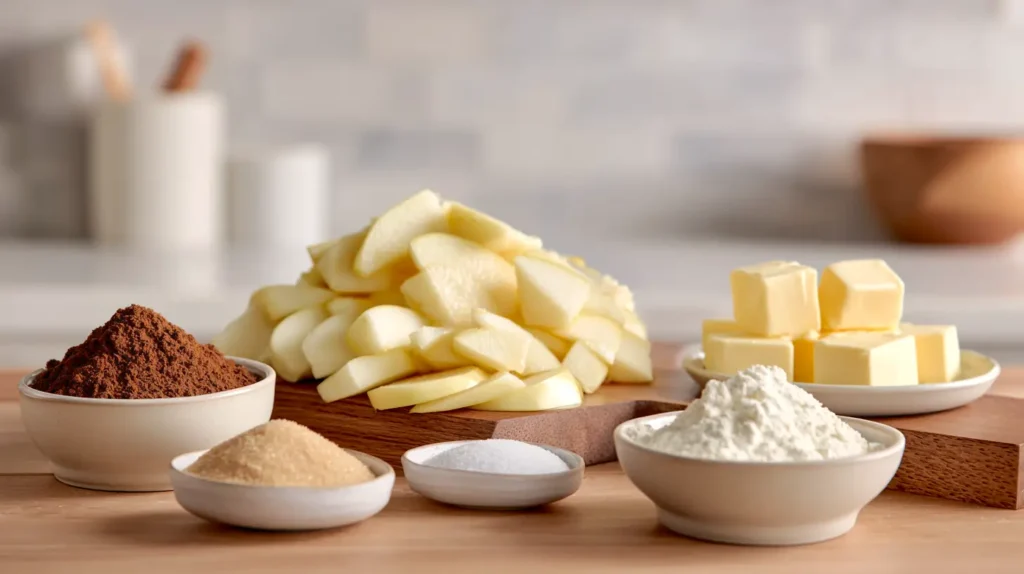
The first part is ingredient control. Cold butter keeps the structure tight, which supports the filling. I cut the butter into cubes, then chill them again. This extra step sounds excessive, but it prevents soft butter from melting into the flour. The dough stays flaky because the fat stays solid. Some people skip this, yet I’ve seen it change texture dramatically.
I also keep my water cold. Sometimes I even drop in an ice cube while measuring. Warm water ruins dough faster than anything else. When the heat rises, especially during Florida afternoons, cold water becomes essential. The dough stays pliable without turning sticky. That simple swap improves the entire process.
Here’s what I use for the dough:
- Two and a half cups all-purpose flour
- One teaspoon salt
- One tablespoon sugar
- One cup unsalted butter, chilled and cubed
- Six to eight tablespoons ice water
These apple pie recipe ingredients stay basic because basic works. Fancy swaps bring unpredictability. Although I experiment with some recipes, I never complicate classic dough. Structure matters too much.
When I mix the ingredients, I work quickly. I blend the flour, salt, and sugar first. Then I cut in the butter using a pastry cutter or my fingertips. I stop when the mixture looks like coarse crumbs. Finally, I add the ice water a little at a time. Dough that’s too wet collapses. Dough that’s too dry cracks. Gradual water fixes both issues.
After it comes together, I divide the dough into two discs. I wrap each disc tightly and chill them. I wait at least two hours. Overnight is even better. Chilled dough rolls easier, holds shape longer, and bakes beautifully. This patient approach makes the apple pie recipe easier to assemble later.
When rolling the dough, I dust the surface lightly with flour. Then I rotate the dough often to prevent sticking. Next, the dough gets lifted gently while I watch the thickness. Even pressure and steady movement keep everything even. Although this sounds meticulous, it becomes natural after a few tries.
The final step is transferring the dough to the pie plate. I roll it around the rolling pin, then unroll it into the dish. This keeps the dough from tearing. Then I trim the edges, chill the dish again, and prepare the filling. Chilling prevents shrinking during baking.
The Filling That Balances Sweetness and Spice
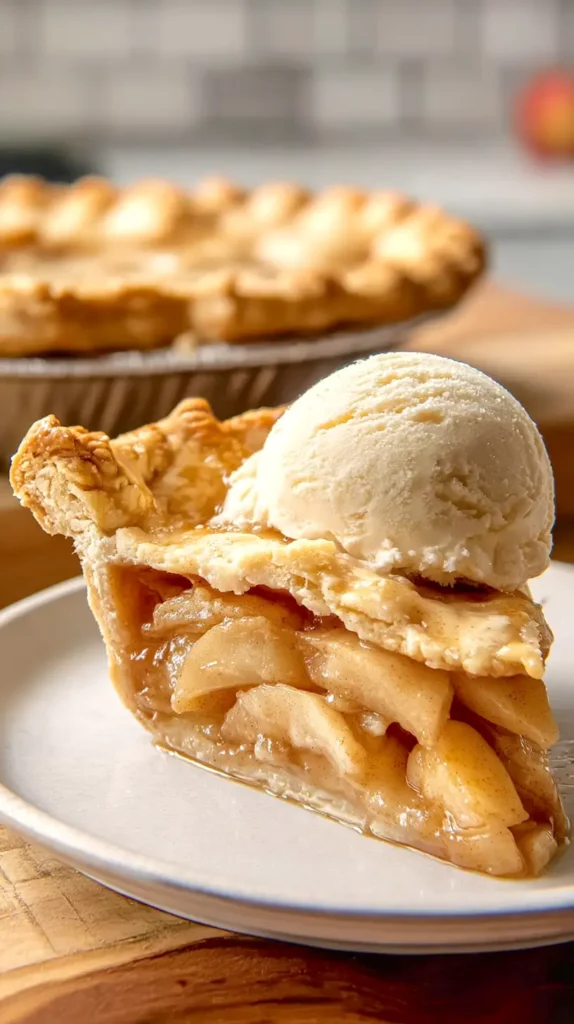
Apple pie filling deserves its own moment. It carries the flavor, so every choice matters. I use a mix of tart and sweet apples because variety adds depth. Honeycrisp, Granny Smith, and Pink Lady work well together. Each kind brings a different sweetness level and texture. Although I sometimes switch varieties, I avoid mushy apples. Soft apples collapse too quickly.
The filling includes sugar, cinnamon, nutmeg, and lemon juice. These ingredients balance the apples without overpowering them. I’ve found that measuring spices carefully prevents bitterness. Cinnamon can take over fast, so I use just enough. Nutmeg adds warmth but needs restraint. Lemon juice brightens everything and prevents browning. It also sharpens the sweetness so the pie doesn’t taste dull.
Here’s my exact filling:
- Six cups thinly sliced apples
- Three-fourths cup granulated sugar
- One-fourth cup brown sugar
- Two tablespoons lemon juice
- One teaspoon cinnamon
- One-fourth teaspoon nutmeg
- One-fourth teaspoon salt
- Three tablespoons cornstarch
These measurements keep the filling stable. Cornstarch thickens the juices enough to prevent runny slices. This matters because runny pie never plates cleanly. It spills everywhere, and the crust gets soggy. Cornstarch fixes that without adding flavor.
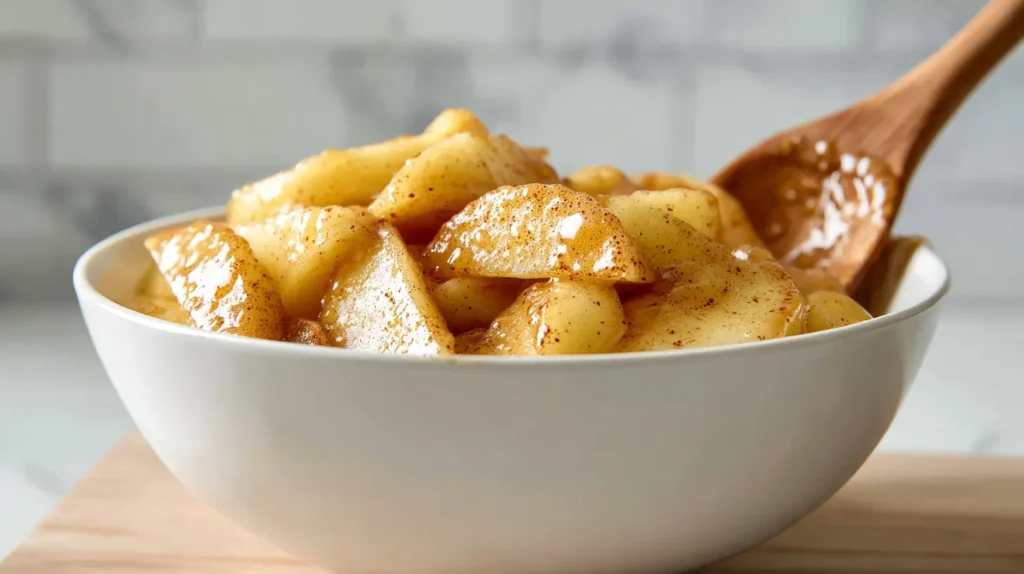
After slicing the apples, I toss them in the lemon juice first. This coats the fruit and preserves color. Then I mix the sugars, spices, salt, and cornstarch in a separate bowl. I sprinkle this mixture over the apples and toss everything carefully. This keeps the starch distributed evenly. Although it can clump in spots, steady mixing avoids that.
I let the bowl rest for ten minutes. This pause lets the apples release some juices. Cornstarch absorbs these juices and forms a syrup. The filling thickens slightly before even entering the pie. This step improves texture because it shortens the liquid adjustment inside the oven.
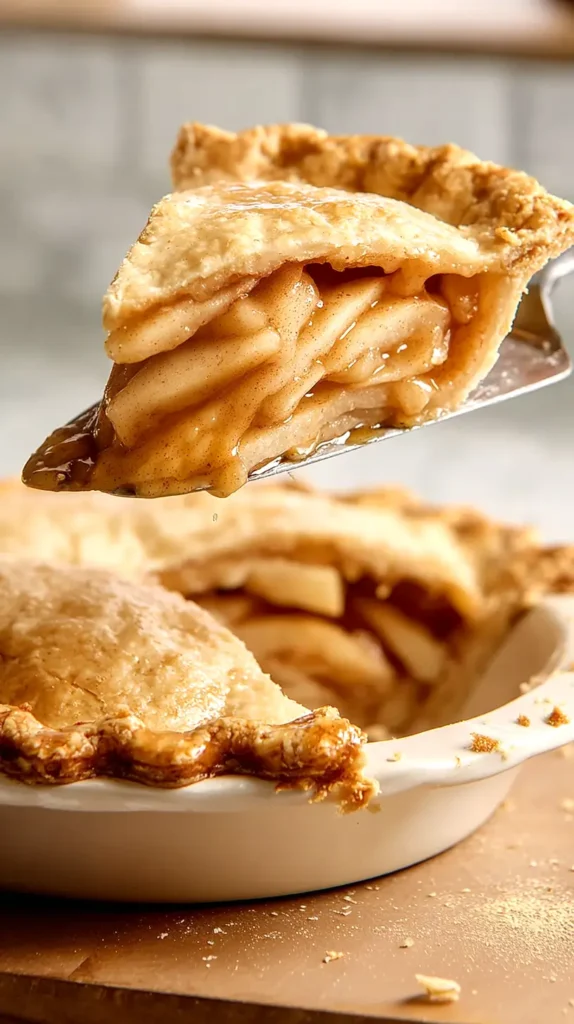
When I assemble the pie, I mound the apples slightly in the center. Apples shrink during baking, so a high center prevents gaps. I pour any leftover syrup into the dish too. That syrup adds richness to the final bite. Although some people skip it, I think it enhances the flavor enough to matter.
This filling supports the apple pie recipe because the balance stays consistent. The sweetness stays present without overwhelming. The spices stay warm without dominating. The texture stays firm without turning rubbery. All of these choices lead to a reliable pie you can slice cleanly.

How to Whip Up a Tasty and Trusty Apple Pie
I assemble my pie with a small routine that keeps everything sturdy. Routine matters because pies shift during baking. A little strategy prevents leaks and prevents collapse. It also keeps the crust crisp, which is my biggest priority.
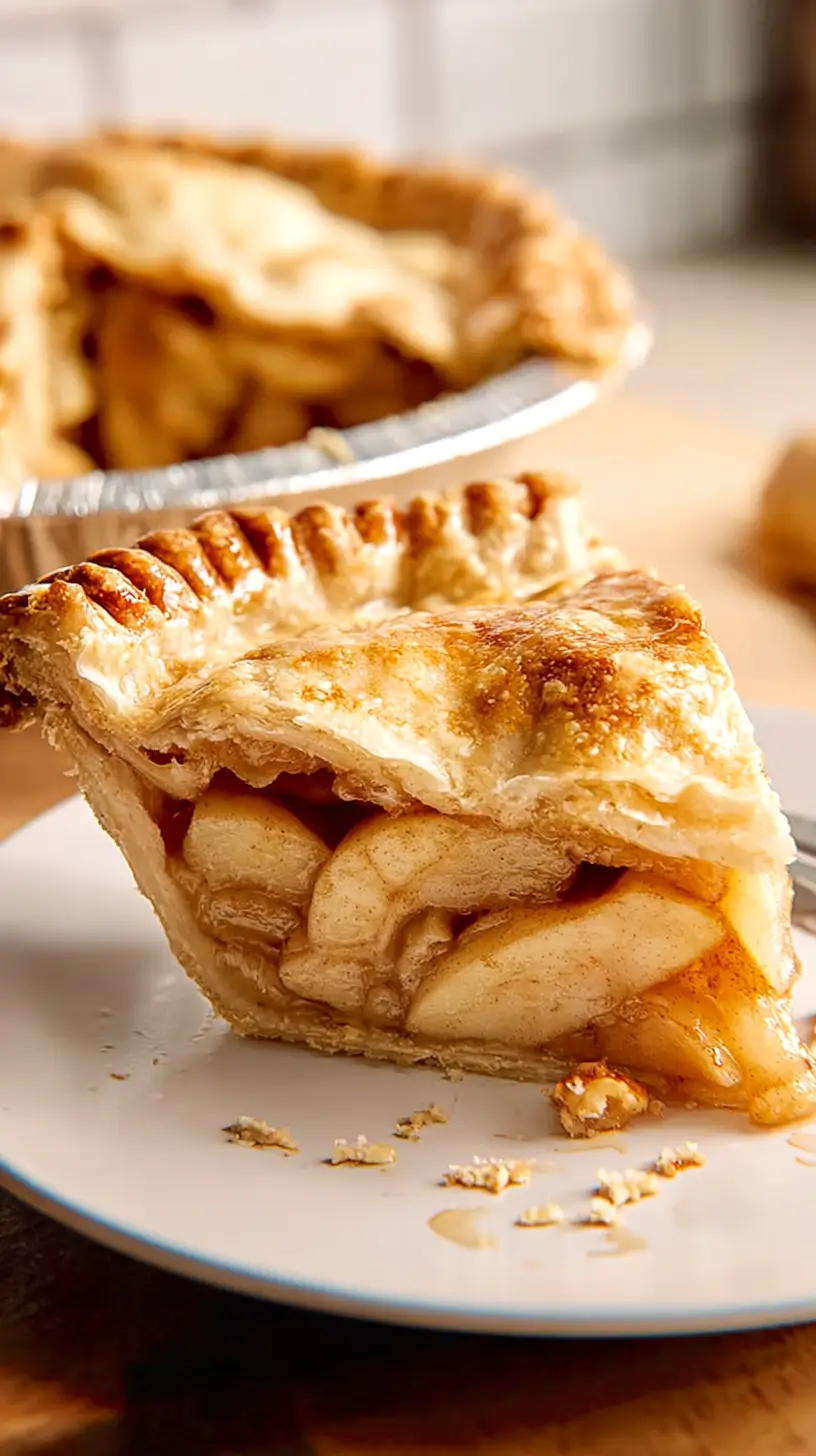
Before adding the filling, I prick the bottom crust lightly with a fork. This creates tiny vents that keep the dough from puffing. I don’t overdo it because too many holes weaken the base. A few light pricks work well. Then I brush a thin layer of egg white across the bottom. This seals the crust so the apple juices don’t soak through.
When I pour the filling into the crust, I distribute it evenly. I press down gently to remove air pockets. Then I add the second crust. I place it over the mound and tuck the edges under the bottom crust slightly. After that, I crimp the edges using my fingers. Crimping seals the pie and stops leaks.
Next, I cut slits in the top crust. These slits release steam during baking. Without them, the pie traps moisture and becomes soggy. Slits also help the crust bake evenly. I arrange them in a simple pattern to keep things neat. Sometimes I do a lattice instead. Although lattices look tricky, they aren’t difficult once you understand spacing.
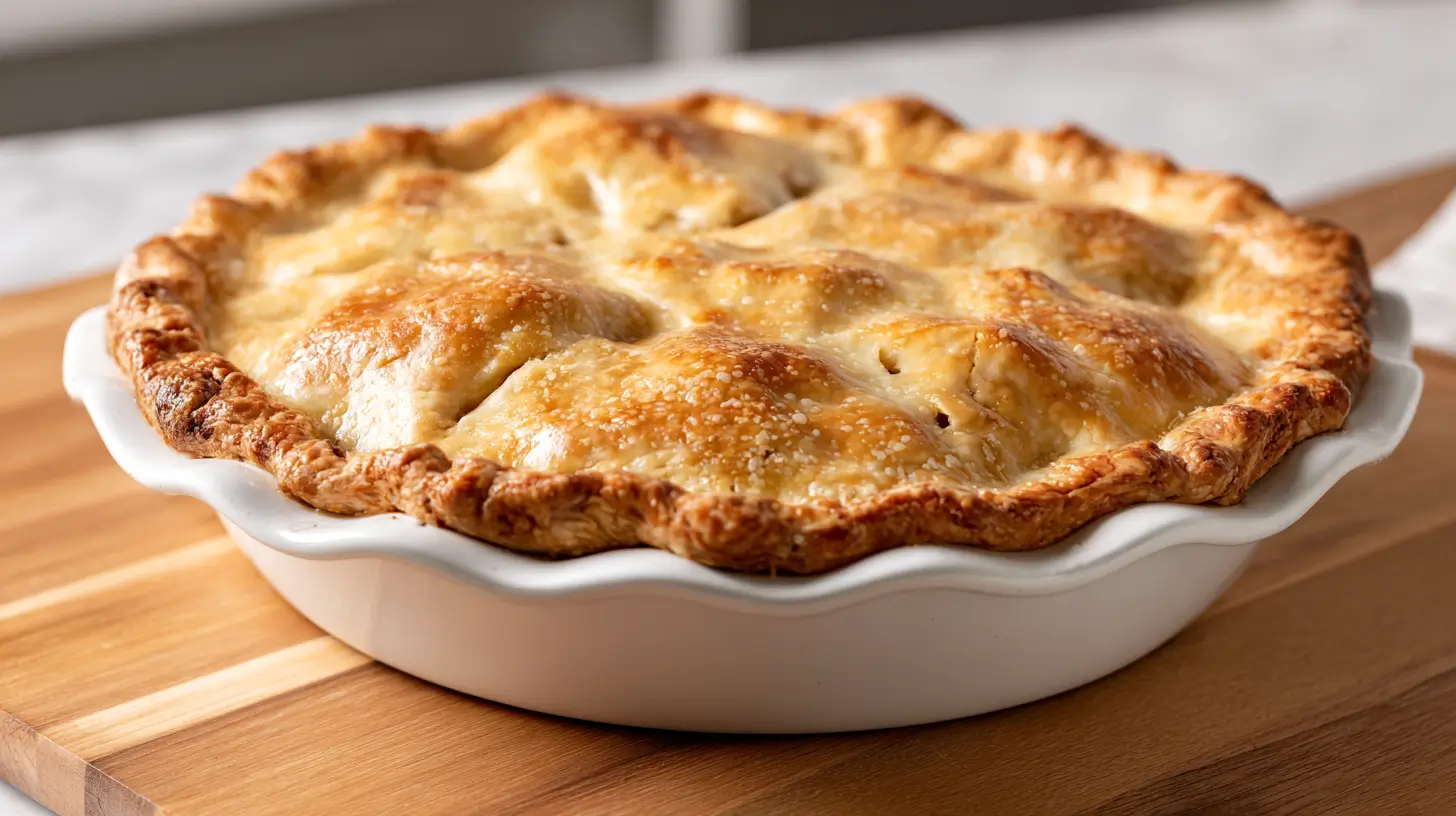
I also add a quick egg wash. One egg mixed with a tablespoon of water creates a glossy finish. I brush it lightly so the crust browns evenly. Then I sprinkle a spoonful of sugar on top for a subtle crunch. This finishing touch makes the pie look polished without becoming complicated.
The pie bakes at 425 degrees for fifteen minutes. Then I lower the temperature to 375 degrees and continue for forty-five minutes. Adjustments may vary depending on oven heat. I cover the edges with foil halfway through if they brown too fast. This keeps everything even.
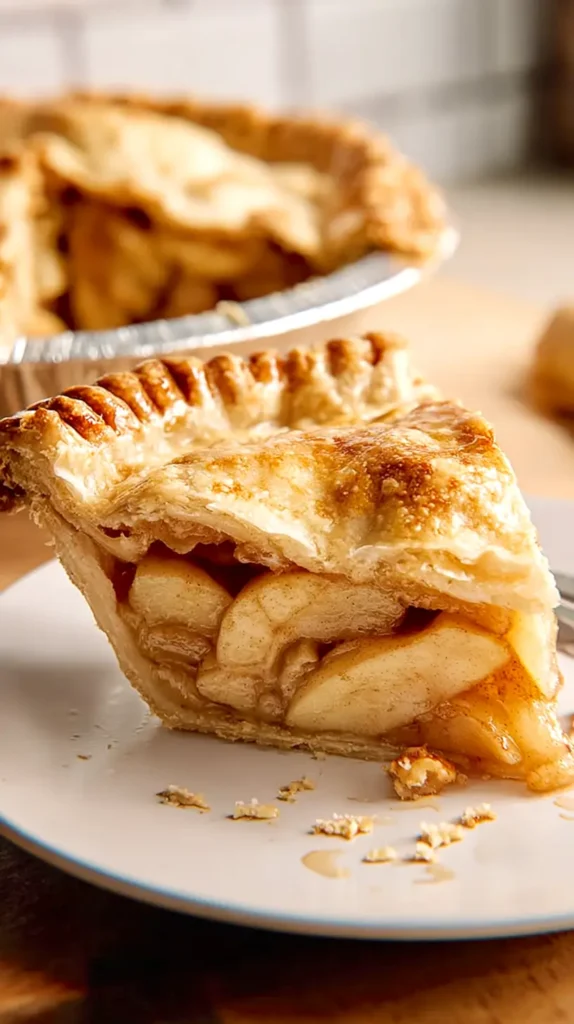
Once the pie finishes baking, it needs to cool for at least four hours. This cooling window sets the filling. Cutting too early leads to loose slices. Although waiting feels tedious, it makes the final result cleaner. The cooled pie slices beautifully, which adds to the apple pie recipe presentation.
Baking Tips That Keep the Crust Crisp
The crust often determines whether a pie succeeds. A crisp crust carries the filling without turning soggy. I maintain crispness through a few reliable habits that work consistently.
I chill everything as I work. Cold dough holds shape better in the oven. Warm dough slumps and loses structure quickly. I place the pie plate in the freezer for ten minutes before adding the filling. This trick strengthens the bottom crust. It also slows melting, which helps the layers form cleanly.
Another helpful step is placing a baking sheet in the oven while it preheats. The sheet becomes very hot and helps crisp the bottom. I set the pie directly on that sheet. The heat transfers quickly and tightens the crust. This method avoids the dreaded soggy bottom issue that ruins texture.
I also avoid overfilling the pie. Too much juice leaks and softens the dough. The cornstarch helps, yet restraint helps too. A balanced amount keeps everything neat. I keep the apple slices level and avoid pushing syrup aggressively into the corners.
Here are the key crisp-crust steps:
- Chill the dough often.
- Freeze the pie plate briefly.
- Use a hot baking sheet under the pie.
- Brush egg white on the base.
- Avoid excess moisture.
Each step plays a small part, but together they strengthen the crust. Although none of them require extra skill, they add noticeable results.
When the pie bakes, I avoid opening the oven often. Heat loss disrupts the crust’s development. I trust the timing and check once near the end. The crust turns golden brown when finished. I look for bubbling juices near the slits. This bubbling confirms the filling reached the proper thickness.
Crisp crust improves the entire apple pie recipe because it supports texture. It keeps each bite balanced instead of mushy. This setup really brings out the flavor, and every little step is totally worth it!
Apple Pie: The Ingredients and How to Make It, Step by Step
Here is the complete recipe in one place for easy reference.
Ingredients for the crust:
Two and a half cups all-purpose flour
One teaspoon salt
One tablespoon sugar
One cup unsalted butter, chilled and cubed
Six to eight tablespoons ice water
Ingredients for the filling:
Six cups thinly sliced apples
Three-fourths cup granulated sugar
One-fourth cup brown sugar
Two tablespoons lemon juice
One teaspoon cinnamon
One-fourth teaspoon nutmeg
One-fourth teaspoon salt
Three tablespoons cornstarch
Ingredients for finishing:
One egg
One tablespoon water
One tablespoon sugar
Instructions:
- Mix flour, salt, and sugar in a bowl.
- Cut in the butter until mixture resembles coarse crumbs.
- Add ice water a little at a time until dough comes together.
- Divide dough into two discs.
- Wrap and chill at least two hours.
- Roll out one disc on a floured surface.
- Place dough in pie dish and trim edges.
- Chill the dish for ten minutes.
- Toss apple slices with lemon juice.
- Mix both sugars, cinnamon, nutmeg, salt, and cornstarch.
- Combine dry mixture with the apples.
- Let apples rest ten minutes.
- Pour filling into crust and mound slightly in the center.
- Roll out second disc and place over the filling.
- Tuck edges and crimp to seal.
- Cut slits in the top crust.
- Whisk egg and water.
- Brush crust lightly with egg wash.
- Sprinkle sugar over the top.
- Bake at 425 degrees for fifteen minutes.
- Lower heat to 375 degrees and bake forty-five minutes more.
- Cover edges with foil if they brown too quickly.
- Cool pie at least four hours before slicing.
Classic Apple Pie
Ingredients
Method
- Mix the flour, salt, and sugar in a large bowl.
- Cut the cold butter into the flour mixture until it looks like coarse crumbs.
- Add the ice water one tablespoon at a time until the dough comes together.
- Divide the dough into two discs and wrap each one tightly.
- Chill the dough for at least 2 hours.
- Preheat the oven to 425°F.
- Roll out the first disc on a lightly floured surface.
- Place the rolled dough into a 9-inch pie dish and press it gently into place.
- Chill the pie dish for 10 minutes.
- Add the sliced apples to a large bowl.
- Sprinkle the apples with lemon juice and toss to coat.
- Mix the granulated sugar, brown sugar, cinnamon, nutmeg, salt, and flour in a separate bowl.
- Pour the dry mixture over the apples and toss until evenly coated.
- Spoon the apple filling into the prepared crust.
- Dot the filling with the small cubes of butter.
- Roll out the second disc of dough.
- Place the rolled dough over the filling.
- Trim, fold, and crimp the edges to seal the crusts together.
- Cut 4 to 6 small vents in the top crust.
- Whisk the egg and water together in a small bowl.
- Brush the egg wash over the top crust.
- Sprinkle coarse sugar on top if using.
- Place the pie on a baking sheet to catch any drips.
- Bake the pie at 425°F for 15 minutes.
- Reduce the temperature to 375°F without opening the oven door.
- Continue baking for 40 to 45 minutes or until the crust is golden brown and the filling is bubbling through the vents.
- Remove the pie from the oven.
- Let the pie cool for at least 2 hours before slicing.
Tried this recipe?
Let us know how it was!A Few More Thoughts on This Apple Pie Recipe
I always enjoy sharing dessert recipes because they carry a sense of comfort. This pie brings steady results without requiring advanced skill. I like knowing I can rely on a recipe that stays consistent from season to season. Although I keep things practical, I still enjoy the small details that make homemade baking rewarding.
Living in Florida shapes how I bake too. I’m always aware of warm weather and humidity, so I adapt my dough steps. Chilled dough matters here more than almost anything else. I adjust, stay patient, and keep my ingredients cold. Those shifts help the process stay smooth. Even simple pies benefit from temperature awareness.
I’ve found that home baking doesn’t need perfection. It needs rhythm, patience, and a clear plan. This apple pie recipe delivers that rhythm in a relaxed way. The steps stay simple, the flavors stay classic, and the structure stays dependable. Although advanced techniques exist, I never chase them for everyday baking. I keep the process calm and predictable instead.
This pie also works well for gatherings because it slices neatly. People appreciate desserts that don’t collapse on the plate. I enjoy serving something that looks polished without requiring stress. It proves that simple food still carries plenty of charm. Each bite brings that cozy taste of apples, sugar, spice, and buttery crust.
I’ll probably share this on Pinterest later because dessert ideas always feel right at home over there. There’s something comforting about seeing a simple, homemade pie pop up while you’re scrolling for inspiration. Recipes like this one have a way of reminding you that classic desserts stay timeless for a reason. They feel familiar without being fussy, and that’s why I keep coming back to them.
If you bake this pie, you’ll see how easy it becomes after one round. You’ll find a rhythm that works for your kitchen and climate. Small adjustments will feel natural. Steady steps always carry you to success here. This apple pie recipe is a classic—reliable, cozy, and always a hit!