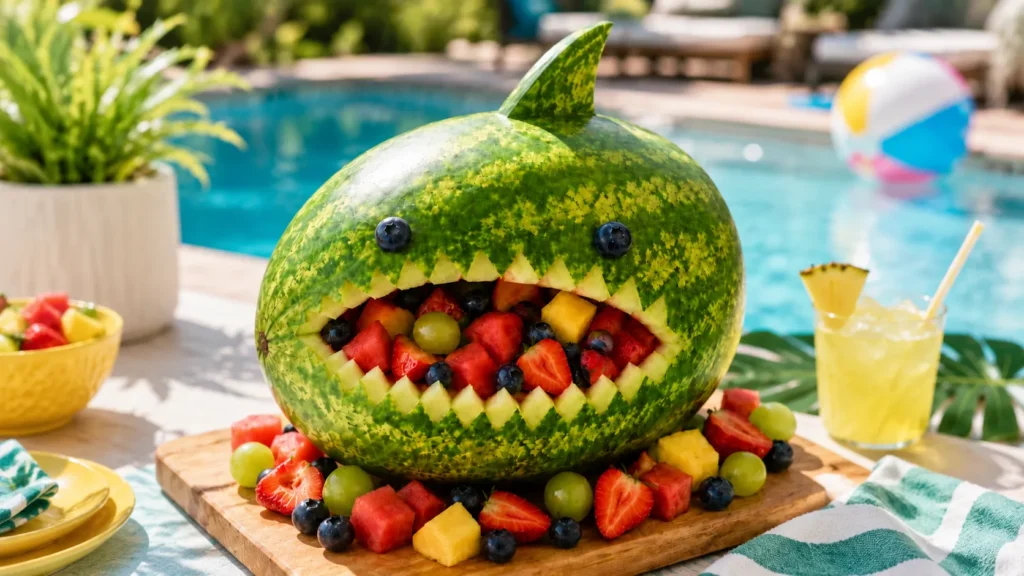
A watermelon shark sounds like one of those party ideas that looks wildly ambitious online. Then you inspect the photos and think, “Who has the time, tools, and emotional stability for teeth?” I get it. The first glance suggests advanced carving skills, a spotless kitchen, and perhaps a minor degree in fruit architecture.
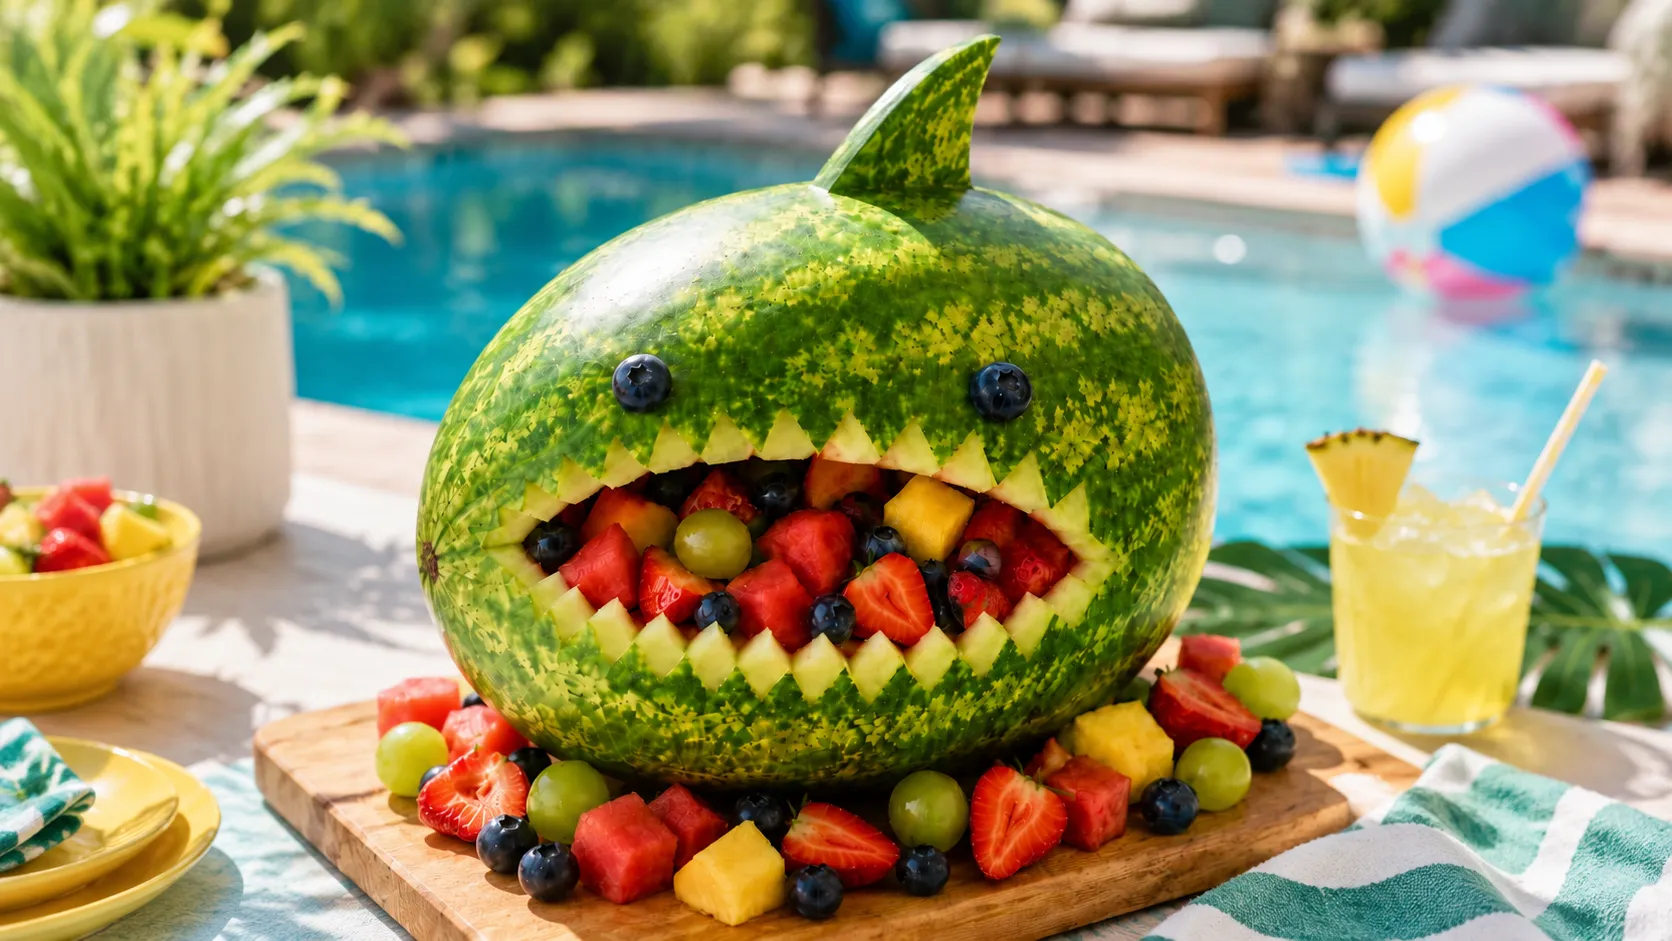
Thankfully, the finished bowl looks much harder than the process. That’s exactly why it works so well for summer parties. Guests see a giant shark mouth packed with fruit, while you quietly know the secret. Most of the effect comes from one angled cut, a wide opening, and several chunky teeth.
As a mom in Orlando, I understand the power of a party idea that keeps children interested. It needs to look exciting, survive warm weather, and avoid requiring seventeen specialty supplies. This project checks those boxes, although I won’t pretend cutting the teeth feels completely normal.
The best part comes later, when the shark stops looking like a lopsided melon. At first, the cuts may look questionable. That stage tests your faith a little. However, the face changes fast once you add eyes, fruit, and a dramatic serving tray.
I’ll walk through the entire process, including the awkward middle. We’ll cover the right melon, useful tools, safer carving, clean teeth, and easy fruit choices. I’ll also share serving tricks that keep everything fresh without turning the table into a sticky splash zone.
There’s one small detail that makes the whole design look far better. Most tutorials rush past it. We won’t.
A few links on this page are affiliate links, so if you click and buy, I might earn a small commission. It never costs you more, and it helps support the site. You can read my full disclosure if you’re into the fine print.
Why a Watermelon Shark Works So Well
A watermelon shark brings exactly the right amount of drama to a summer table. It looks impressive, yet it still serves a practical purpose. Instead of adding another decoration, you turn the serving bowl into the main event.
That contrast matters. Plenty of party food looks cute but creates extra work. Meanwhile, this idea holds fruit, starts conversations, and fills a large space. I appreciate anything that earns its place on the table.
The shape also gives you plenty of forgiveness. Sharks don’t need perfect smiles, balanced cheeks, or matching eyebrows. In fact, slightly uneven teeth make the face look more playful. That’s excellent news for anyone holding a kitchen knife with cautious optimism.
Another surprise involves the fruit itself. You don’t need an elaborate tropical mix. Watermelon chunks, grapes, strawberries, pineapple, and blueberries already create strong color. The bowl looks full because the opening frames everything like a bright display window.
Still, the design needs a little restraint. Adding every ocean-themed detail can make the shark look cluttered. One fin, two eyes, and a clean mouth usually create the strongest result. More isn’t always more, especially when blueberries start rolling toward the floor.
You may also assume this project belongs only at children’s parties. I disagree. A watermelon shark works at pool parties, beach cookouts, summer birthdays, and casual family gatherings. Adults will admire it, photograph it, and then quietly steal the best pineapple pieces.
The real charm comes from the mix of silly and useful. It’s playful without becoming flimsy. Better yet, it’s memorable without requiring a craft store expedition. Most importantly, it turns ordinary cut fruit into something people notice.
That missing detail I mentioned earlier starts with the base. Before any carving begins, the melon must sit still.
Choosing the Best Melon for a Carved Fruit Bowl
The right melon makes the carving easier before you even touch the knife. Look for an oblong watermelon with a fairly even shape. A round melon can work, but an oval body creates a longer shark face.
Size matters, although bigger doesn’t always mean better. A medium watermelon fits most refrigerators and serving trays. It also weighs less when you need to rotate it during carving. Your wrists will appreciate that small mercy.
Check the rind for major dents, soft spots, or deep scratches. Minor marks won’t matter because the design hides plenty. However, soft areas can collapse while you cut. That’s not the type of party surprise anyone needs.
Next, inspect the field spot. A creamy yellow patch usually means the watermelon ripened on the ground. The fruit should also feel heavy for its size. A heavy melon generally holds plenty of water and crisp flesh.
Now comes the oddly important part: set it on the counter. Watch how it rests naturally. You want a stable side that won’t roll. If every position wobbles, you can still create a flat base later.
I tend to notice that people focus only on sweetness. Flavor matters, of course, but structure matters here too. An overripe watermelon can feel mealy and release extra liquid. That makes the finished bowl softer and messier.
Choose the melon one or two days before serving. Then keep it chilled until carving time. Cold rind feels firmer, and chilled fruit stays fresh longer.
Don’t carve it several days early. The edges can dry, while the fruit releases juice. Instead, prepare the shark the same day whenever possible.
Once you find a sturdy melon, wash and dry it well. Then clear more counter space than seems necessary. Watermelon projects expand.
Materials and Ingredients You’ll Need
You don’t need professional carving tools for this watermelon shark. A few basic kitchen items handle nearly everything. However, a small paring knife makes the teeth much easier than a giant chef’s knife.
Gather the tools first, because sticky hands make drawer searching unpleasant. I’m strongly against surprise scavenger hunts during fruit preparation.
Materials:
- One large cutting board with a nonslip base
- One sharp chef’s knife
- One sharp paring knife
- One large metal spoon
- One melon baller, if desired
- Two toothpicks
- One washable marker
- One large serving tray
- Paper towels for quick cleanup
Ingredients:
- One medium oblong watermelon
- Two large blueberries or black grapes
- Three cups mixed fruit
- One tablespoon lemon or lime juice
- Extra watermelon chunks from the carved center
For the mixed fruit, use sturdy pieces that hold their shape. Pineapple chunks, strawberries, grapes, cantaloupe, honeydew, and blueberries work well. Bananas brown quickly, so I usually skip them.
You can also keep the filling simple. A bowl packed mostly with watermelon still looks bright and generous. Add two contrasting fruits, and the colors will appear more intentional.
The citrus juice remains optional, but it helps some fruits stay fresh. Use only a light amount. Too much juice creates a slippery pool inside the shark.
A washable marker helps outline the mouth before cutting. You may worry about marking the rind. That’s fair. Keep the line inside the area you plan to remove.
Finally, choose a tray with a raised edge. Watermelon releases juice, even after careful draining. A flat board looks pretty until liquid reaches the tablecloth.
The supplies look almost too ordinary. Good. Save the complicated tools for a project that truly needs them.

How to Carve a Watermelon Shark Step by Step
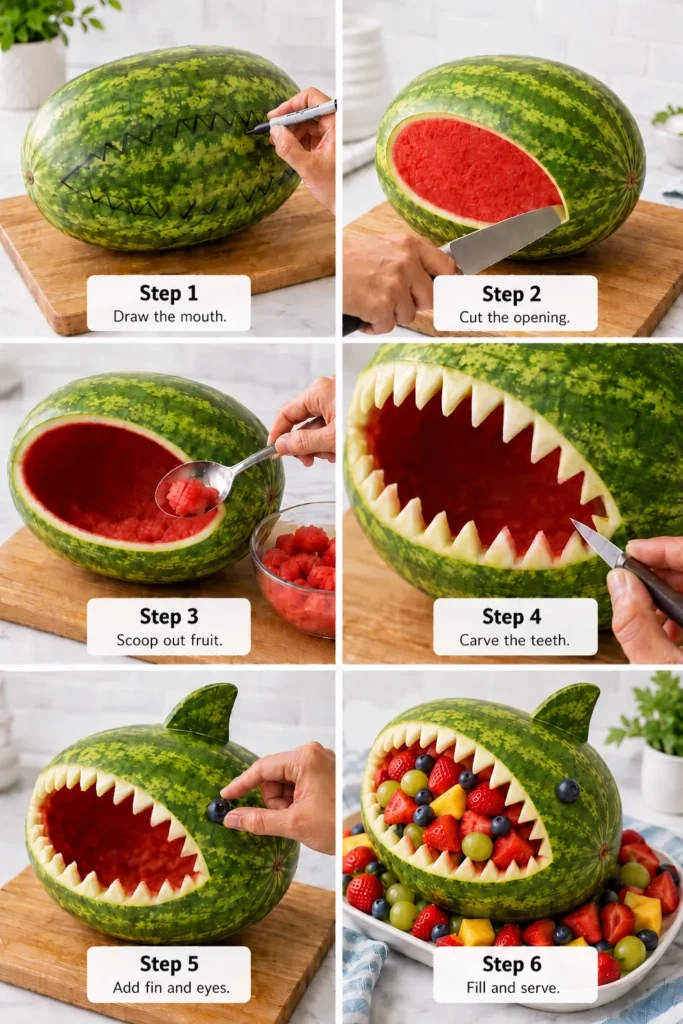
Start by placing the watermelon on its most stable side. If it rolls, slice a thin piece from the bottom. Keep that cut shallow, or you may expose the flesh.
Then angle the melon so one end rises slightly. That higher end becomes the shark’s head. A folded kitchen towel under the back can help during planning.
Follow these steps:
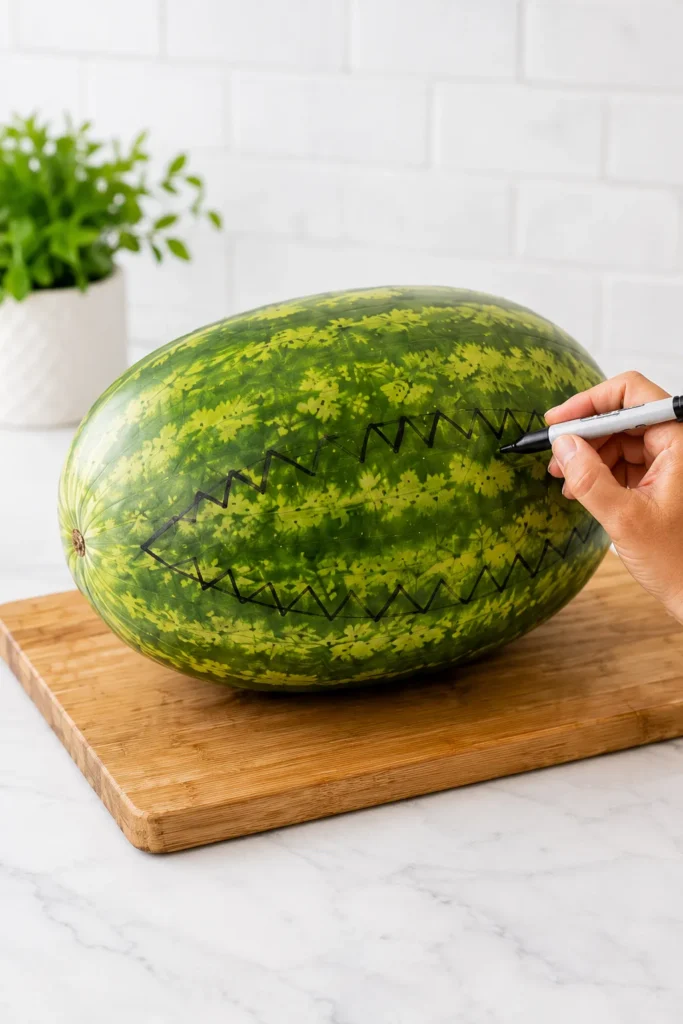
- Draw a wide, curved mouth across the front third.
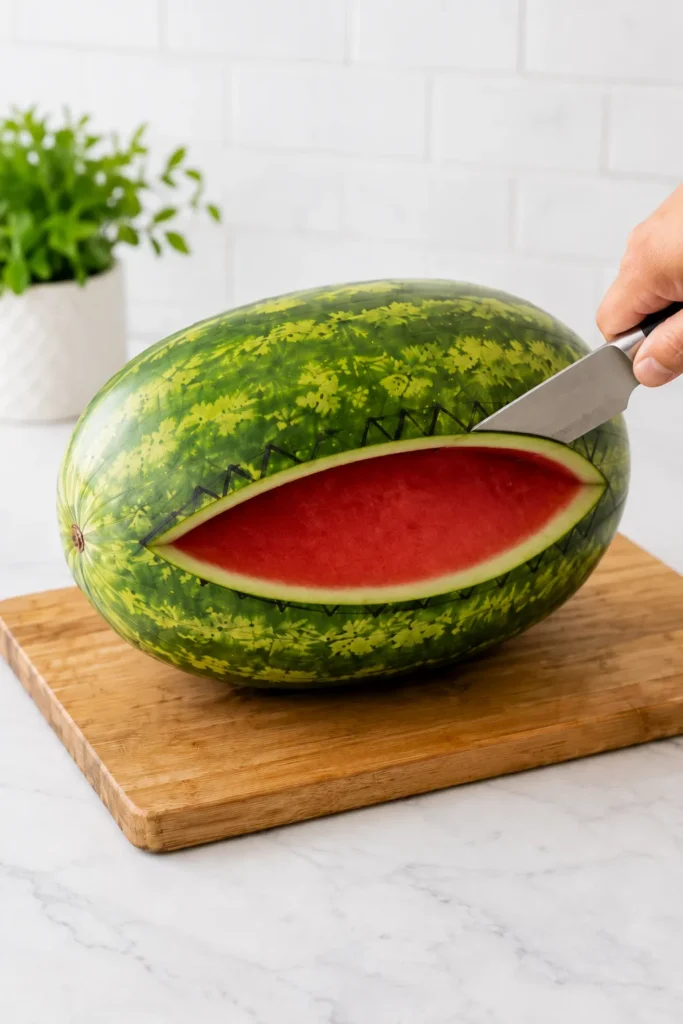
- Cut along the line with the chef’s knife.
- Remove the large rind section in one piece.
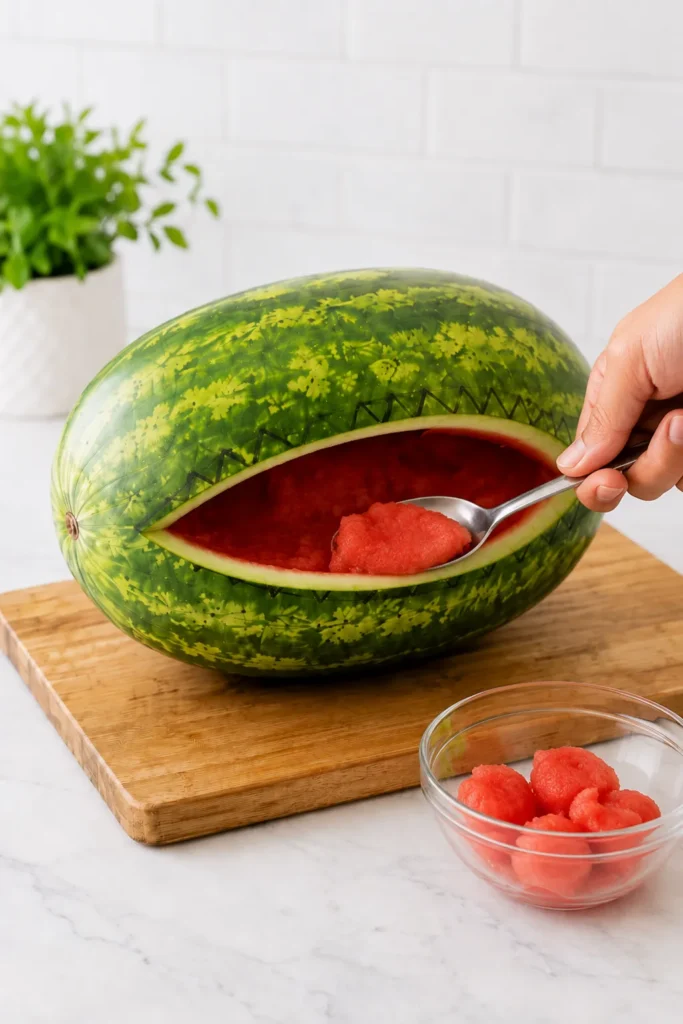
- Scoop out the exposed flesh with a spoon.
- Leave about one inch of red flesh near the rind.
- Drain extra juice into the sink.
- Pat the cavity gently with paper towels.
- Save the removed rind for the dorsal fin.
Don’t hollow the watermelon completely. A thin layer of red fruit creates the gum line. It also gives the teeth better contrast.
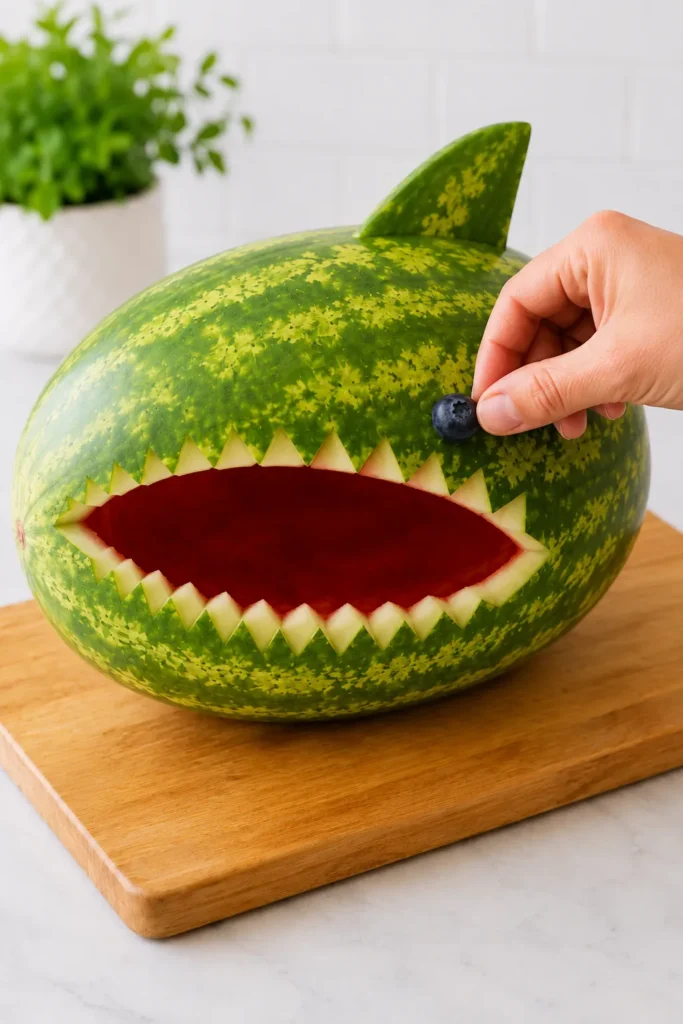
Next, cut a triangle from the reserved rind. Shape it into a simple fin with a flat base. Secure it near the back using two toothpicks.
Now check the face from several angles. This matters more than perfect measurements. A mouth can look balanced from above and oddly narrow from the front.
If the opening seems too small, widen it gradually. Large cuts are difficult to undo. Small adjustments keep the shape under control.
At this stage, the watermelon shark may look more like a surprised canoe. Stay with it. The eyes and teeth create the expression.
Carve two shallow eye holes above the mouth. Press one blueberry or black grape into each hole. Toothpick pieces can secure them, but hide every sharp end.
The basic shape now exists. However, the teeth decide whether the face looks sharp, playful, or mildly confused.

Shaping the Watermelon Shark Mouth and Teeth
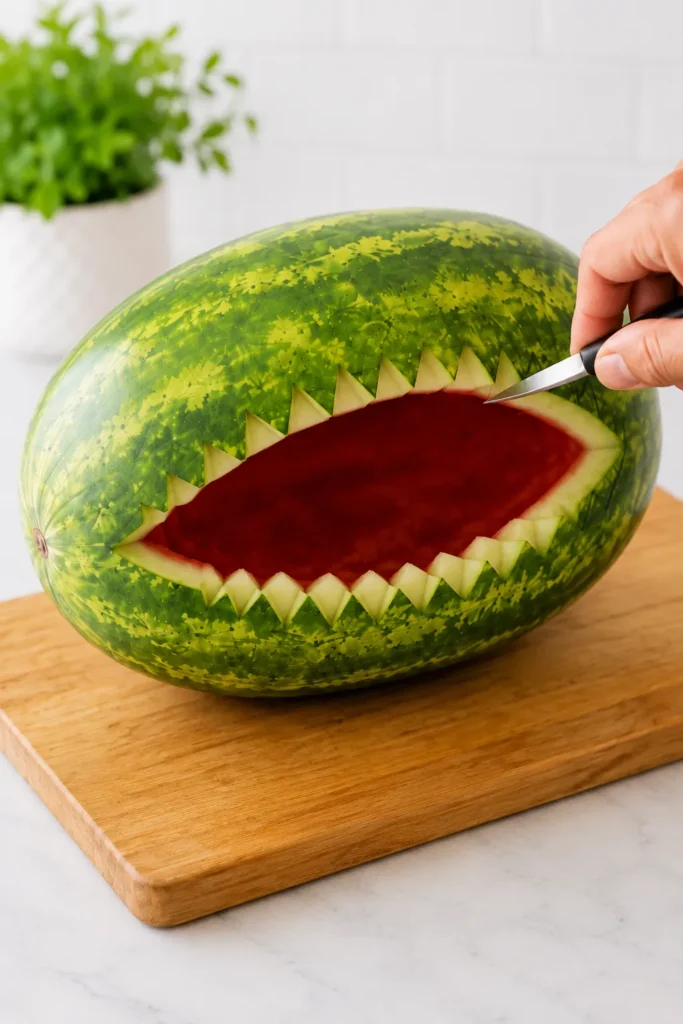
The teeth make this project recognizable, but they don’t need tiny details. Large triangles look cleaner and take less time. They also stay stronger when the watermelon sits on the table.
First, trim away a narrow strip of green rind around the mouth. Remove only the dark outer layer. Leave the pale white rind underneath to form the teeth.
Then use the paring knife to cut repeated triangles. Work slowly around the upper and lower edges. Keep each tooth about one-half inch wide.
A few practical tips help here:
- Cut every second triangle first.
- Rotate the watermelon instead of twisting your wrist.
- Wipe the knife when juice builds up.
- Make the corner teeth slightly smaller.
- Stop before the gum line becomes too thin.
You don’t need matching teeth. In fact, a little variation gives the mouth more character. Still, extremely thin points can snap or curl.
Here’s the common mistake: carving deep triangles into the red flesh. That removes the crisp white border. Instead, keep the tooth cuts within the white rind layer.
The mouth should look wide from the front. If it seems flat, remove a little more rind near each corner. That subtle curve creates the open-jaw effect.
Now inspect the lower edge. Water can collect there and soften the teeth. Blot the area, then tilt the melon briefly to drain it.
You may want to add a red fruit roll-up as a tongue. I’d skip it. The natural watermelon already provides enough color, while candy can become sticky.
For a cleaner finish, scrape loose red bits from the inner wall. Don’t polish everything smooth, though. The bowl should still look fresh, not engineered.
Once the mouth looks right, the hardest visual step ends. Filling it properly changes everything again.
Filling and Serving the Shark Without a Mess
Before adding fruit, chill the carved watermelon for at least thirty minutes. Cold rind holds its shape better. It also gives you extra serving time outdoors.
Meanwhile, cut the fruit into bite-size pieces. Keep the chunks fairly large, because tiny pieces settle into juice. Larger pieces also look brighter inside the wide mouth.
Drain every fruit before mixing. Strawberries, pineapple, and melon can release surprising amounts of liquid. A colander handles this better than hopeful optimism.
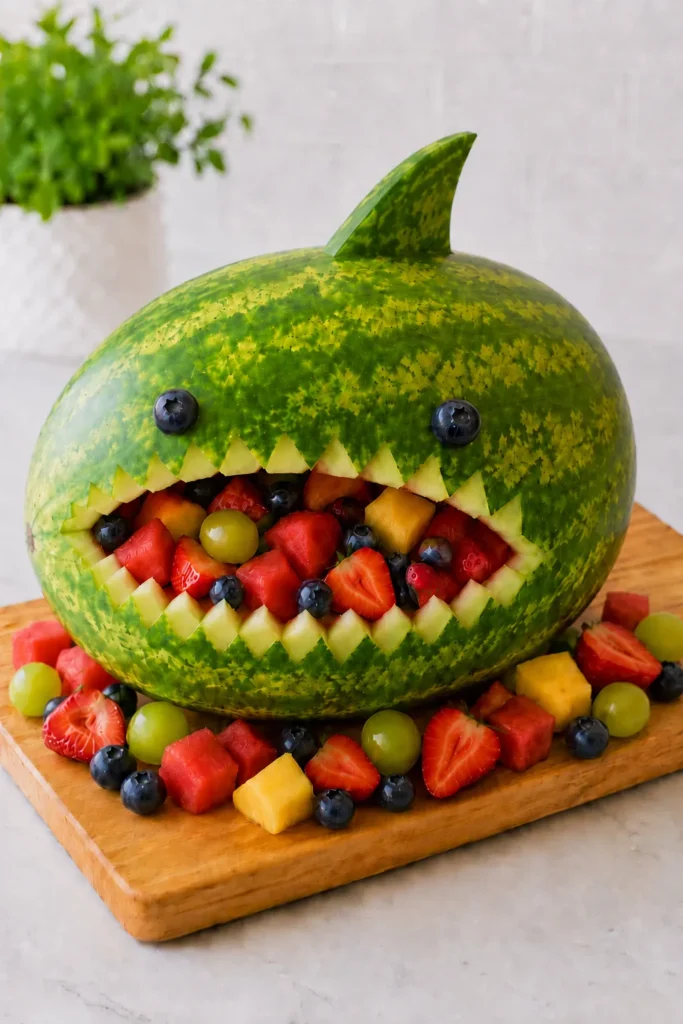
Toss the fruit with a small splash of lemon or lime juice. Then spoon it into the cavity. Don’t pack the mixture tightly, or the bottom pieces may crush.
Let some fruit spill slightly onto the tray. That creates an abundant look without requiring a completely full watermelon shark. However, keep the spill controlled. Grapes love dramatic exits.
Place extra fruit in a separate chilled bowl. Refill the shark as guests serve themselves. This approach keeps the display fresh and prevents the fruit from warming too quickly.
For serving, place long toothpicks, small tongs, or a slotted spoon nearby. A regular serving spoon can carry too much juice. The slotted option keeps plates cleaner.
You can also surround the base with blue napkins or a pale table runner. That adds an ocean hint without covering the tray in plastic decorations. Simple styling lets the carved fruit stay central.
Outdoors, keep the tray away from direct sunlight. Shade matters more than ice under the bowl. Ice can shift the melon and create extra water.
After two hours outside, replace or refrigerate the fruit. Hot weather shortens that window. Orlando heat doesn’t negotiate.
The cleanest display comes from planning the refill. Even the prettiest shark can’t rescue warm, watery fruit.
Watermelon Shark Tips That Prevent Last-Minute Panic
Most problems with a watermelon shark come from stability, moisture, or rushed cutting. None require advanced skill. They simply need attention before the party starts.
Keep these tips nearby:
- Chill the whole watermelon before carving.
- Use a damp towel under the cutting board.
- Cut a very thin base for stability.
- Draw the mouth before using the knife.
- Save the largest rind piece for the fin.
- Keep toothpicks hidden and counted.
- Drain fruit before filling the mouth.
- Refrigerate the finished shark until serving.
The toothpick count deserves special attention. Use the fewest possible, and note exactly where they sit. Remove them before giving leftover rind to children.
Another smart move involves timing. Carve the watermelon early on the party day, then add fruit later. This keeps the edges crisp and the filling fresh.
If a tooth breaks, don’t chase perfection. Trim the neighboring teeth slightly, then continue the pattern. Guests won’t compare the mouth to a dental chart.
If the fin leans, cut a wider base. Two short toothpick pieces usually hold it better than one long piece. A flat fin base also prevents the rind from tearing as guests reach across the tray. Again, hide all sharp ends completely.
You can prepare the fruit one day ahead. Store each type separately, especially strawberries and pineapple. Mix everything shortly before serving.
Avoid freezing the carved melon. Freezing damages the texture and creates more liquid during thawing. Cold works; frozen doesn’t.
One more opinion: skip elaborate gummy fish inside the bowl. They soften, bleed color, and complicate serving. Fresh fruit already delivers the bright ocean-party effect.
You’re allowed to keep this simple. That isn’t cutting corners. It’s protecting the part everyone will remember.
Common Questions and Easy Serving Ideas
Can I make the watermelon shark the night before? Yes, but keep the fruit separate. Wrap the carved melon tightly and refrigerate it. Add the filling close to serving time.
How long will the carved watermelon stay fresh? The empty shell stays best for about one day. Once filled, serve it within several hours. Refrigerate leftovers quickly.
What fruit works best inside the bowl? Choose firm fruit with strong color. Grapes, berries, pineapple, cantaloupe, honeydew, and watermelon hold up well. Avoid very soft peaches or ripe bananas.
Can I make this without toothpicks? Yes, although the fin may need another support method. Cut a narrow slot and press the fin into place. Keep the slot shallow.
How do I stop the shark from rolling? Slice a thin, flat base from the bottom. Then place the melon on a nonslip board or raised tray.
Serving ideas can stay easy. Pair the fruit bowl with sandwiches, grilled food, chips, or a simple snack board. The shark already creates enough visual excitement.
For a pool party, serve fruit in small paper cups beside the tray. Guests can grab portions without crowding the table. This also helps children carry fruit more safely.
At a birthday party, add blue plates and striped napkins. You could also label the serving area “Shark Snacks,” although the carved face needs little explanation.
For adults, pair the fruit with sparkling water, lemonade, or a light summer punch. Keep alcoholic drinks on a separate table, especially near children.
The watermelon shark can also hold only watermelon cubes. That option costs less, saves time, and still looks bold.
The goal isn’t a perfect themed buffet. Instead, the goal is one unforgettable centerpiece that people can eat.
The Party Trick Worth Showing Off
I like party ideas that deliver a big reaction without demanding a week of preparation. A watermelon shark fits that sweet spot. It looks theatrical, but the structure stays wonderfully basic.
There’s also something satisfying about watching the face appear. One minute, you have a heavy green melon. Soon, you have a wide shark mouth filled with bright fruit.
The imperfect parts help, too. A crooked tooth won’t ruin the design. Meanwhile, a slightly uneven fin may look better. This isn’t a wedding cake judged under studio lights.
That freedom matters. It lets you enjoy the table instead of guarding it like a museum display. A centerpiece should start the fun, not require constant attention.
As a mom in Orlando, I’m drawn to summer food that looks fun and handles heat sensibly. Chilled fruit makes sense here. A carved serving bowl makes it far more interesting.
You’ll probably take a photo before anyone starts eating. That’s reasonable. Pinterest has trained all of us to document the cute table before the grapes disappear.
Still, don’t protect the display for too long. The whole point is letting people dig in. Set out the serving spoon, step back, and enjoy the reaction.
Later, you may notice how little the guests cared about perfect teeth. They’ll remember the open mouth, the colorful fruit, and the unexpected centerpiece. That’s the useful lesson hiding inside this silly project.
Party food doesn’t need to whisper. Sometimes it should arrive with fins, sharp teeth, and absolutely no apology.