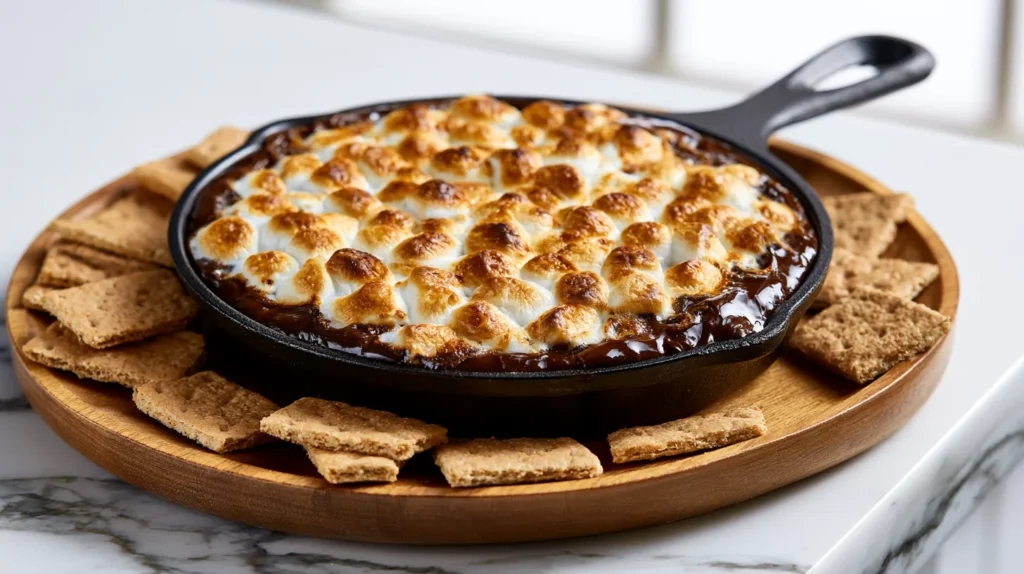
Some dessert recipes require a lot, and I’m not always in that season. Smores dip fits the moment when everyone wants chocolate, marshmallows, and graham crackers without outdoor smoke drama. You get the cozy part of a backyard treat, minus the flaming marshmallow rescue mission.
I’ve found that people judge easy desserts like they’re cutting corners. Not here, friend. Sometimes the simplest pan on the table creates the most happy little traffic jam. People wander over, grab a cracker, and suddenly the kitchen gets louder. That is my kind of dessert math.
As a mom, I appreciate recipes that don’t require perfect timing or tiny assembly stations. I also appreciate anything that doesn’t leave me scraping sugar off ten random surfaces. So this one lands right in that sweet middle ground. It feels playful without turning the kitchen into a full event.
You only need basic ingredients, a small skillet, and a little patience near the broiler. However, the tiny details still matter more than they look. Chocolate texture, marshmallow coverage, and sturdy dippers can change the whole experience. A too-hot pan can make the chocolate grainy. Meanwhile, flimsy cookies can snap at the worst moment. Plus, this is the kind of recipe that helps a last-minute sweet craving look planned. I am very supportive of fake-planned energy. That’s where the fun starts, because this dessert looks simple until the small tricks make it wildly better.
A few links on this page are affiliate links, so if you click and buy, I might earn a small commission. It never costs you more, and it helps support the site. You can read my full disclosure if you’re into the fine print.
Why Smores Dip Beats Campfire Chaos
Classic campfire smores have a nostalgic pull, and I’m not here to fight the memory. They include crunchy graham crackers, melted chocolate, and toasted marshmallows with all the sticky charm. However, the real-life version can become a tiny outdoor circus very quickly.
One person wants a marshmallow barely toasted. Another wants a charred edge with serious commitment. Then the chocolate stays firm, the cracker cracks, and a sticky hand touches the patio chair. Cute in theory, but slightly feral in practice.
With smores dip, you keep the same familiar flavors in one warm pan. You still get chocolate, marshmallows, and graham crackers. Yet nobody has to build each bite while balancing a paper plate on their knee. That alone lowers the dessert stress level.
I tend to notice this recipe works best when people want something casual. It doesn’t need forks, plates, or a formal dessert moment. Instead, everyone can scoop from the edge and keep chatting. That makes it ideal for movie nights, birthdays, sleepovers, and easy summer hosting.
The texture also feels more even than regular smores. Each scoop can include soft chocolate, toasted marshmallow, and crisp cracker. You avoid cold chocolate in one bite and all marshmallow in another. That matters when the whole point is comfort.
Here’s the little reframe I love. This isn’t a lazy version of a classic. It’s a less annoying version of a classic. Sometimes removing the fussy parts makes the whole thing more fun. Plus, fewer moving parts means fewer sticky surprises.
That is why I like this version for indoor hosting. You get the campfire flavor without assigning anyone marshmallow duty. Plus, the whole thing stays in one pan, which means fewer crumbs in odd places.

The Simple Ingredients That Make This Work
This recipe uses regular grocery-store ingredients, which I deeply support. Nobody needs a dessert list that reads like a scavenger hunt. However, each ingredient still matters because the texture depends on balance, not luck. That’s the quiet trick behind a smooth pan.
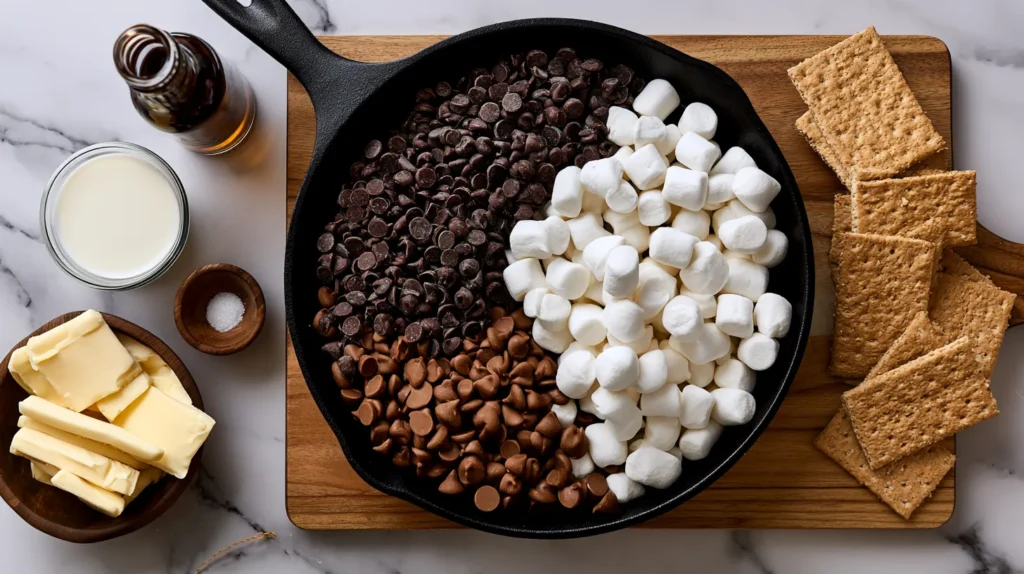
For one 8-inch skillet, you’ll need:
- 2 cups semi-sweet chocolate chips
- 1/2 cup milk chocolate chips
- 2 tablespoons unsalted butter
- 1/4 cup heavy cream
- 1 teaspoon vanilla extract
- 1/8 teaspoon salt
- 3 cups mini marshmallows
- Graham crackers, for dipping
- Pretzel rods, strawberries, or cookies, for serving
Semi-sweet chocolate keeps the sweetness from going too far. Meanwhile, milk chocolate adds that familiar candy-bar flavor people expect with smores dip. I like using both because the blend tastes classic without getting cloying. That balance matters once marshmallows go on top.
Butter adds richness to the chocolate base. Heavy cream keeps the texture softer after baking, which helps each scoop glide better. Vanilla adds a warmer flavor, while salt keeps the chocolate from tasting flat. Tiny salt, big payoff.
Mini marshmallows work best because they cover the surface evenly. Large marshmallows can work, but you’ll need to cut them first. I prefer avoiding extra sticky steps when dessert is supposed to be easy.
Graham crackers are the classic dipper, of course. Still, pretzels, strawberries, and cookies add more variety around the skillet. A few options make the whole spread look fuller without adding much work. That’s helpful for parties and casual nights.
One more small thing matters here. Use fresh marshmallows if you can. Stale marshmallows do not melt as evenly, and the top can look patchy instead of golden. That small detail helps the top brown more evenly.
How To Make Smores Dip Without Overthinking It
You can make this smores dip quickly, so gather everything before turning on the heat. That tiny bit of prep saves you from rummaging through cabinets while chocolate melts. I’ve learned that dessert feels easier when the counter isn’t chaotic. It also keeps the process from getting weirdly stressful.
Start by preheating the oven to 400°F. Then grab an 8-inch cast-iron skillet or small oven-safe baking dish. A slightly larger dish works, but the chocolate layer will be thinner. That means more toasted top and less gooey center.
Follow these steps:
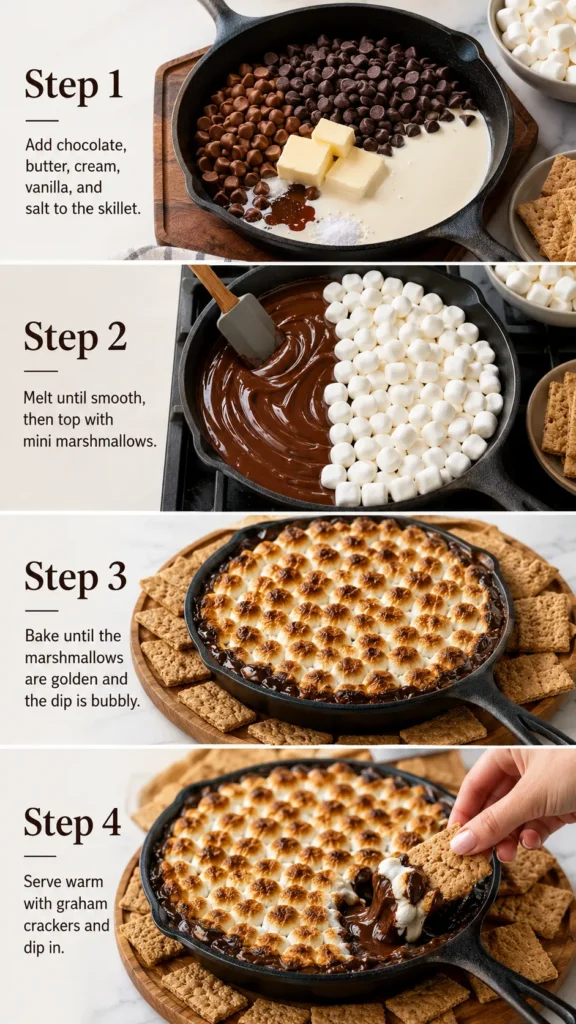
- Add chocolate chips, butter, heavy cream, vanilla, and salt to the skillet.
- Place the skillet over low heat on the stove.
- Stir often until the chocolate melts smooth.
- Remove the skillet from the heat.
- Spread the chocolate mixture into an even layer.
- Sprinkle mini marshmallows across the top.
- Bake for 5 to 7 minutes.
- Broil for 30 to 60 seconds for deeper browning.
- Rest for 3 to 5 minutes before serving.
Low heat is not a cute suggestion. It protects the chocolate texture. High heat can make melted chocolate grainy, and that is not the dessert mood we want. Keep the heat gentle and stir slowly.
Also, stay near the oven if you broil the marshmallows. They can brown very quickly. I like golden tops with a few deeper spots, not a scorched layer that smells like poor choices.
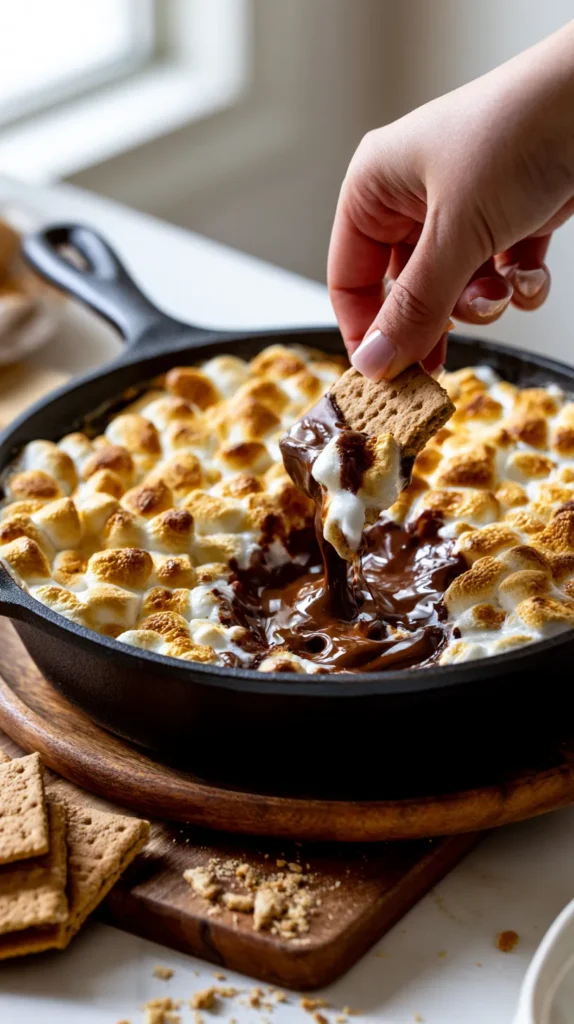
After baking, the short rest helps the chocolate thicken slightly. It also prevents the first eager scoop from burning someone’s mouth. Dessert excitement is great. Mouth lava is not. Serve the pan warm with dippers close by, then let everyone dig in.
If you use a ceramic dish, add one extra minute if needed. Cast iron heats faster and holds heat longer.
The Tiny Texture Tricks People Miss
Texture can make this recipe taste polished, even when the method stays easy. That’s the sneaky little win here. A smooth chocolate base and an evenly toasted top make the whole pan better. Skip those details, and the result can taste flat.
First, use low heat when melting the chocolate. Chocolate responds better to steady warmth than a rushed blast of heat. If the heat runs too high, the mixture can seize or turn grainy. Then you’re stuck trying to rescue dessert before anyone notices.
Heavy cream also matters because it keeps the base scoopable. Milk can work in a pinch, but the texture will be thinner. Half-and-half works too, though the chocolate may firm up faster. For the best smores dip texture, heavy cream earns the spot.
Use restraint with the marshmallow layer. Cover the chocolate, but don’t create a mountain. Marshmallows expand as they heat, and too much topping can brown before the center warms through. One even layer gives better results.
The pan size changes the final bite more than people expect. An 8-inch skillet gives you a deeper chocolate layer. A 9-inch dish spreads the chocolate thinner and creates more toasted surface. Neither option is wrong, but they eat differently.
Here’s my slightly bossy opinion. Don’t chase perfection with this dessert. Chase scoopable chocolate, lightly browned marshmallows, and dippers that don’t snap instantly. That’s the goal.
If the chocolate thickens too much, add one tablespoon of warm cream. When it seems too thin, melt in another handful of chocolate chips. Small fixes keep everything calm. A tiny adjustment can save the texture without starting over.
Also, serve it soon after baking. The texture stays best while the chocolate remains warm and loose.
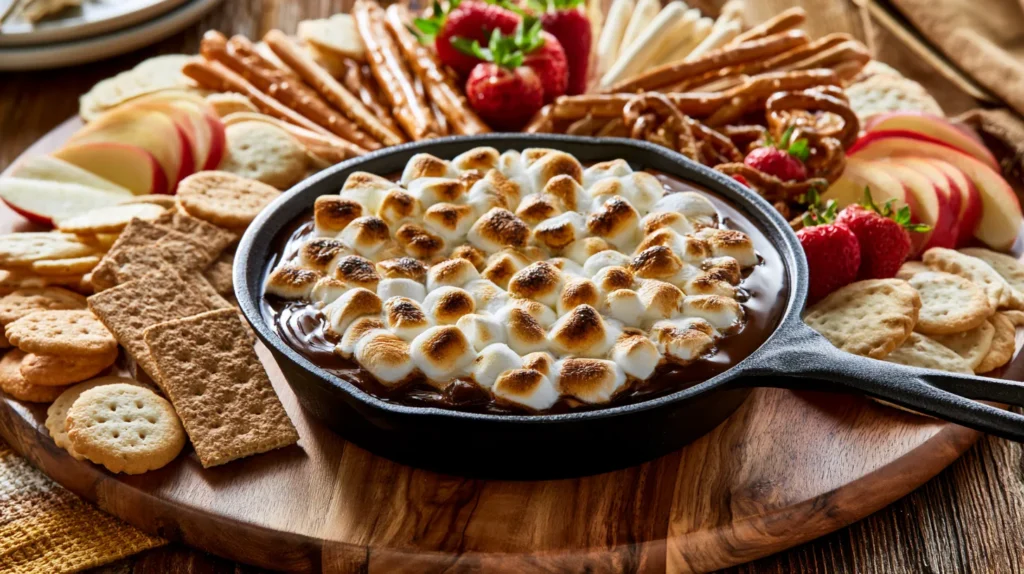
Best Dippers And Serving Ideas For Smores Dip
Graham crackers make the obvious choice, and I would never remove them from the table. They give you the classic flavor and a sturdy crunch. However, smores dip becomes much more fun when the dippers have variety. The board looks better too, which never hurts.
I like building the serving board with four types of options. Use something classic, something salty, something fruity, and something cookie-like. That mix keeps the bites from tasting the same. It also makes the board look fuller without needing fancy styling.
Try these dippers and serving ideas:
- Graham cracker squares for the classic bite
- Chocolate graham crackers for extra richness
- Pretzel rods for salty crunch
- Pretzel crisps for easy scooping
- Vanilla wafers for a softer cookie option
- Shortbread cookies for a buttery bite
- Strawberries for freshness
- Apple slices for crisp contrast
- Banana slices for soft sweetness
- Rice crispy treats for parties
- Cinnamon pita chips for warm spice
- Butter cookies for a pretty board
For serving, place the warm skillet in the center of a board. Then arrange crackers and cookies closest to the pan. Keep fruit slightly farther away from the warm dish. Warm strawberries are not the vibe, and I stand by that.
Also, put out more graham crackers than seems reasonable. People reach for them first because the classic combo makes sense. Then they start testing pretzels and cookies once they get comfortable. That’s usually when the board gets interesting.
For kids or larger groups, choose wide dippers. Thin cookies can break under thicker chocolate. A broken cookie in the skillet isn’t a disaster, but it does slow the scooping line. And yes, there will be a line.
Flavor Twists That Still Keep The Classic Vibe
I love a dessert variation, but only when it stays connected to the original idea. Some twists go too far and make everyone wonder what happened. This recipe should still taste like chocolate, marshmallows, and graham crackers. Everything extra should add interest, not confusion.
Peanut butter is an easy option. Swirl 1/3 cup creamy peanut butter into the melted chocolate before adding marshmallows. Don’t mix it completely. The ribbons create different bites without turning the whole pan into peanut butter dessert.
Caramel also fits nicely with the classic base. Drizzle 1/4 cup caramel sauce over the melted chocolate. Then add marshmallows and bake as usual. A tiny pinch of flaky salt after baking adds a sweet-salty edge.
For a cookie version, sprinkle 1/2 cup crushed chocolate sandwich cookies over the melted chocolate. Then add the marshmallows. Serve it with graham crackers and extra cookies. That keeps the smores dip flavor familiar while adding a little crunch.
Peppermint works during the holidays, but go carefully. Use only 1/4 teaspoon peppermint extract. More can taste too sharp, and nobody asked for toothpaste dessert. Cinnamon is gentler. Add 1/2 teaspoon to the chocolate mixture for a warmer flavor.
Here’s the important part. Pick one twist, not five. Peanut butter, caramel, peppermint, cookies, and cinnamon together sounds like a dessert dare. I respect bold choices, but that is chaos in a skillet.
A single variation keeps the flavor clear. It also helps guests know what they’re eating before they take a second scoop. Simple changes usually work better than a crowded ingredient list.
For a party, label any nut version clearly. That tiny hosting detail keeps things simple, thoughtful, and much less awkward.

Make-Ahead, Storage, And Reheating Tips
This recipe tastes best right after baking, but you can prep parts ahead. That helps when you’re hosting and already juggling drinks, napkins, and someone asking where the serving spoons went. Small prep can make dessert feel less frantic. It also keeps the counter from turning into a chocolate command center.
You can measure the chocolate chips, butter, cream, vanilla, and salt earlier in the day. Keep everything ready near the stove. Then arrange the crackers, pretzels, and cookies on a board before guests arrive. Add fruit closer to serving time so it stays fresh.
You can also make the chocolate base up to 24 hours ahead. Melt the chocolate mixture, spread it into the skillet, cover it, and refrigerate it. Before baking, let the skillet sit at room temperature for 20 minutes. Then add the marshmallows.
Do not add marshmallows before refrigerating. They can get sticky and lose their shape. Fresh marshmallows brown better and look cleaner after baking. That detail matters when the pan heads straight to the table.
If the chilled base seems very firm, warm it before adding the topping. Bake the chocolate base for 3 minutes at 400°F. Then add marshmallows and bake until golden. This two-step method helps the center warm without overbrowning the top.
Leftovers can stay in the fridge for up to 3 days. Cover the dish tightly or move leftovers into an airtight container. Reheat small servings in the microwave for 15 to 20 seconds. Stir gently if the chocolate separates at the edges.
Still, I would not make a storage plan the main strategy. People often revisit this dessert for one more bite. That tiny phrase usually means the leftovers are in danger.
Smores Dip FAQs For Real-Life Dessert Moments
Dessert questions tend to appear right when the oven timer beeps. So, I like having the answers ready before the chocolate melts. These are the smores dip questions that matter most in a real kitchen. Nothing here needs to be complicated.
- Can I make this without a cast-iron skillet? Yes, use any small oven-safe dish. An 8-inch square dish works well. Glass and ceramic dishes may heat slower than cast iron.
- Can I use large marshmallows? Yes, but cut them in half first. Large marshmallows puff more and cover the top unevenly. Mini marshmallows make the easiest layer.
- Can I double the recipe? Yes, double every ingredient and use a 9-by-13-inch baking dish. Bake a few extra minutes. Watch the top near the end.
- Can I make it in the microwave? Melt the chocolate base in a microwave-safe bowl using 20-second bursts. Stir between each burst. Then transfer it to an oven-safe dish.
- Why did my chocolate turn grainy? The heat likely got too high. Stir in warm cream, one tablespoon at a time. Next time, use lower heat.
- Can I make this gluten-free? Yes, serve it with gluten-free graham crackers or cookies. Also check your chocolate and marshmallow labels.
- How do I keep it warm? Serve it in a warm dish. Reheat it in a 300°F oven for 2 minutes if needed.
- What else can I serve with it? Try pretzels, strawberries, apple slices, vanilla wafers, or butter cookies. Sturdy dippers work best.
One more tiny note matters. If the dip cools, don’t panic. Warm it briefly and keep scooping. Dessert should stay easy, even after the first round.
That tiny reset keeps the whole thing relaxed. Warm, scoop, repeat, and move on with your night.
Smores Dip
Ingredients
Method
- Preheat the oven to 400°F.
- Add the semi-sweet chocolate chips, milk chocolate chips, butter, heavy cream, vanilla extract, and salt to an 8-inch cast-iron skillet or small oven-safe baking dish.
- Place the skillet over low heat on the stove.
- Stir often until the chocolate melts smooth.
- Remove the skillet from the heat.
- Spread the chocolate mixture into an even layer.
- Sprinkle the mini marshmallows across the top in one even layer.
- Bake for 5 to 7 minutes.
- Watch closely near the end so the marshmallows toast without burning.
- Broil for 30 to 60 seconds if you want deeper browning.
- Stay near the oven while broiling.
- Let the dip rest for 3 to 5 minutes before serving.
- Serve warm with graham crackers, pretzel rods, strawberries, or cookies.
Tried this recipe?
Let us know how it was!The Sweet Little Skillet Moment I’d Keep
I’m always drawn to desserts that bring people toward the same spot without needing a grand plan. A warm skillet, a pile of crackers, and a few happy scoops can do a lot. Smores dip fits that easy, cozy, slightly messy dessert lane beautifully.
As a mom, I appreciate recipes that don’t require perfect timing or formal plating. Real life already has enough moving parts. Sometimes dessert needs to be simple enough for a weeknight and cute enough for a party table. This one lands right there without making the whole kitchen feel like a project.
I also like that it gives campfire flavor without demanding a campfire setup. Skip the smoke and outdoor heat. No marshmallow negotiations under pressure. Just a warm pan, plenty of dippers, and a table people want to revisit. That is cozy enough for me.
Pinterest may love a pretty toasted top, but real life loves a dessert people finish. That’s the sweet spot I care about most. Pretty is nice, but empty-pan energy tells the real story. I’ll always pick the recipe people keep scooping.
So, yes, I’d keep this recipe close for movie nights, birthdays, sleepovers, or last-minute company. It’s easy without being boring, nostalgic without being fussy, and cozy without requiring a fire pit. The best part is how little effort it needs before everyone starts circling the pan.
Low effort, high reward, sticky fingers, happy table. That’s the whole delicious point.